
Hey there!
We are inching ever closer to the point where we start actually running traffic on our site (and therefore making $) – exciting or what!
But, first, there’s a few final admin/setup hurdles we need to jump through.
In this post I’m going to describe which ad networks you’ll want to get set up on and how to do that. Oh, and I’ll talk you through linking all the various Google tools you will need to use so that you can accurately track the stats that your site will produce.
Getting on the ad networks
Last week I told you some of the names of the ad networks we will eventually use (Google AdSense, Content.Ad, Outbrain, RevContent, Taboola, Native Ad Networks, Ad Blade, MGID, Instacator, My Likes, Adngin…). For the moment we are only testing and running traffic through 3 of these: AdSense, Content.Ad and Outbrain.
The same principles apply to more or less all of them.
Essentially, you just need to sign up with them. You’ll need your credit card details etc. because you going to be loading these accounts with money and/or receiving payments from them.
1) Outbrain (https://my.outbrain.com/amplify/funnel/register)
You’ll want to sign up as an advertiser to Outbrain.

2) Content.Ad (https://app.content.ad/Register)
You’ll want to sign up as an publisher on Content.Ad
Here you can see how you have to choose on Content.Ad whether to be a publisher or an advertiser. We signed up as both, although so far we’ve only used their services as a publisher.

3) Google AdSense (As a publisher)
Jake told you how to get an AdSense account set up in blog 2.
Account verification: a word of warning
It turns out that maintaining ready and steady cash flow is one of the trickiest parts of running an arbitrage site. In the initial stages you’re going to spending more than your earn – fact! So, any profits that you do earn you’ll want to get back into your bank account (so that you can use them to spend on buying more advertising. Therefore, when you sign up for your AdSense and Content.Ad accounts, make sure you complete all the authentication and verification steps as quickly as possible. If you don’t this happens:

AdSense send a proof of address snail mail to your registered address – which is fine if you work from home – but we had trouble collecting ours because we were away traveling. This meant we couldn’t authenticate our account immediately and therefore AdSense wouldn’t release the money we’d made from them until we did. We’d budgeted properly so we were able to sort it out before it became a massive problem but just be warned – once you’ve started testing your campaigns you’ll want to focus on that and not be messing around with admin stuff.
What Next?
Outbrain, AdSense and Content.AD are the ones we started with and that’s all you really need to get started. However, there are some other things you should set up at this stage too so that you can access all the data you will need to optimize your ad campaigns.
Google Analytics
You will also need an Analytics account. Sign up for that using your gmail address by visiting google.com/analytics. Click the Sign in to Analytics button (top right), and follow the on-screen instructions.
Once you’ve got an analytics account you need to set up a property in the account you have created. To be honest, the Google instructions for this are clear and thorough so we’ll let you follow them.
Enabling Tracking with Google Tag Manager
You also need to connect Google Analytics to your website, so that Google Analytics can track all the activity on your site. The Google tool for this is called Tag Manager.
To register go to – https://www.google.co.uk/analytics/tag-manager/.

Then follow the instructions given here: https://support.google.com/tagmanager/answer/6103696?hl=en&ref_topic=3441530.
In fact, watch the video – that’s the clearest explanation.
You have to do 4 things. There’s some funny terminology involved but you don’t really need to understand it; just follow these steps.
1) Create a “container” for your website (translation: create a thing that Google needs to track your site) by entering the necessary details about your site.
2) Generate the container “snippet” (translation: bit of code that Google uses to do this) for your site. This will look like this:

3) Copy that snippet (the text in that box) to EVERY page of your website.
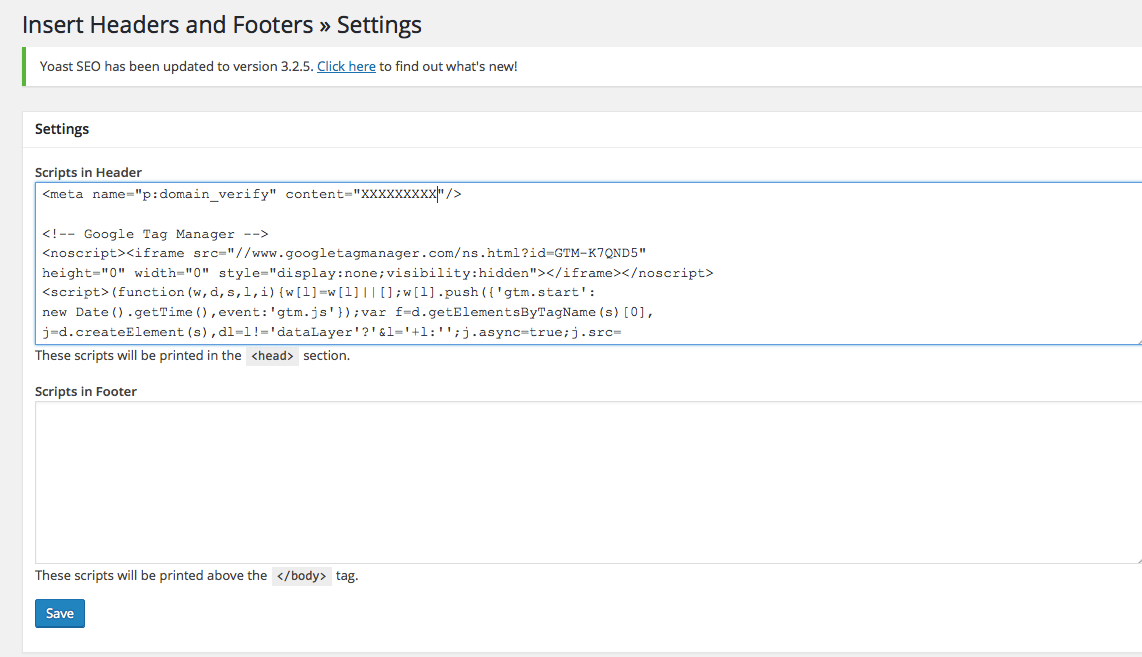
The easiest way to do this is to use the Insert Headers and Footers plugin on WordPress. Once you have installed the Insert Headers and Footers plugin, go to Settings > Insert Headers and Footers and copy the Tag Manager snippet text into the Scripts in Headers box like so:
This will now mean that your Tag Manager tag is present in every page on your site that a user can click on.
4) The final thing you need to do is to go back into Google Tag Manager and create the Google Analytics “tag” (even I’m confused at this point! But trust me, just go through these step by step while you’re doing them and they will make sense!). Do this by going to Container > Overview > Add new tag. You should see this screen:

Just follow those instructions and you’ll be set.
Link Adsense and Analytics
To make it easier to see the stats about your site (visits, performance, etc.) and the AdSense ads that are running on it (the revenue they bring in, number of click throughs etc.) all in Analytics, you need to link your AdSense and Analytics accounts.
To do this just follow these instructions: https://support.google.com/adsense/answer/6084409?hl=en-GB
It can take about a day for them to become linked. Once it’s done you will be able to see any AdSense data in Analytics (you won’t have any at this stage because you’re not running any ads).
What’s a Widget?
To actually get ads from AdSense and Content.Ad to display on your site your going to have to go into WordPress and tell it to display them via “widgets” using the tracking codes that lead back to your accounts. Widgets are just the little boxes that house the ads and their text. This process is kinda technical and deserves a post of its own (next week!).
What’s The Time Mr. Wolf?
When you start running and optimizing campaigns you will look at the effects that the changes you make to your adverts have on your revenue. To do this you will be comparing the data you get on Outbrain with the data you get on AdSense. (We’ll go into the nuts and bolts of that in later posts).
To do this accurately you need to make sure you’re comparing apples with apples and pears with pears. Let’s say you run your campaign over two days. After the first 24 hours you make a change to your Outbrain campaign – maybe you modify your original headline/image that you used to advertise the story you are promoting. At the end of the 48 hours, you want to see whether modifying the original headline/image made you more or less money in AdSense. If the two platforms are reporting data in different timezones then the true picture of what effect the modification had will not be clear: this will affect your ability to figure out what is most profitable and therefore your ability to make money. Therefore it’s important to synchronize (as much as possible) the time zones used on each platform.
AdSense and Google Analytics are easy to customize, whereas OutBrain is fixed to EST and Content.Ad is fixed to PST. Annoying, but you can live with it. We opted for changing AdSense and Analytics to EST so that they match up with Outbrain. (Content.Ad don’t give you much data to crunch so you won’t do that much optimization of their ads. Therefore it’s more critical that the AdSense and Outbrain data ‘line up’.)
~
Alrighty. That felt like a long one but you should now be well on your way to setting up (and verifying!) your accounts with the ad networks.
Next week we’ll tell you how to get the AdSense and Content.Ad ad widgets up and running on your site so that you can actually start making money!
Dan